This article will expand on the information about the Go Ethereum wallet found in my article about cryptocurrency mining. I will provide some suggestions you can try if you have problems with your wallet and we’ll take a look at advanced ways to use the wallet.
Contents
1. Troubleshooting
2. Finding Geth
3. Command Line Synchronization
4. Clean Up Old Blockchain Data
5. Add Tokens to the Ethereum Wallet
6. Retrieve the Ethereum Wallet Private Key
7. Other Wallet Options
Troubleshooting
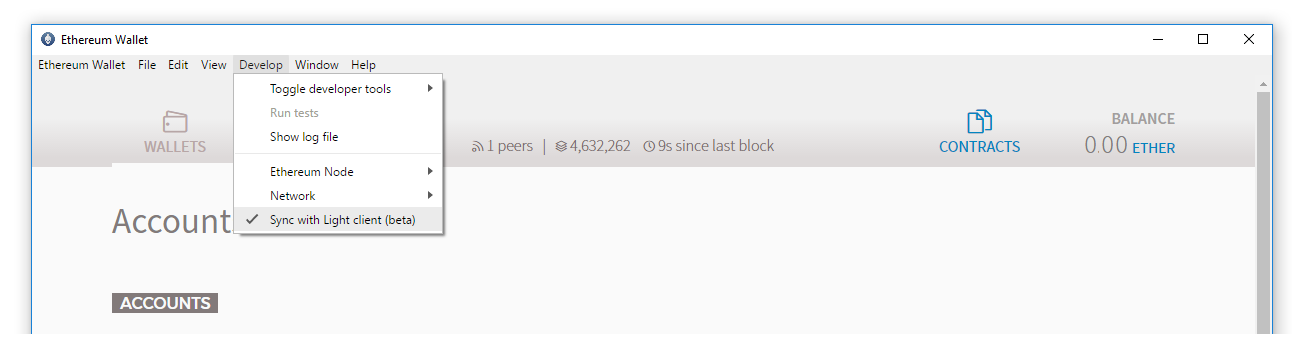
If the wallet synchronization process is not working, there are a few steps you can try to find the error. Assuming that you are using the light client mode as recommended in my cryptocurrency mining article, the first thing to try is to wait for a few hours and see if a connection to the Ethereum network is established. If your wallet still will not synchronize despite waiting, try to turn the light client mode off (just untick the ”Sync with Light client (Beta)” option in the Develop menu of the wallet, see image below).
 This should allow your wallet to synchronize, although the process will now take dozens of hours and require 50+ GB of space since you will do a regular synchronization instead of a light one.
If turning the light client mode off does not relieve your problems with wallet synchronization you may want to try using the command line interface (CLI) to synchronize with the Ethereum network. This method will give you more information about what is actually going on. To start using the CLI, we will need to dig a bit deeper into the inner workings of the Ethereum wallet. Let’s take a look at geth.
Finding Geth
The program that actually takes care of the wallet interaction with the Ethereum network is called geth (short for Go Ethereum). When the Ethereum wallet is opened it will automatically check for the most recent version of geth and download this version if it is not already available on your computer. The download location varies based on your operating system and whether you downloaded Mist or Ethereum Wallet. On Windows you can find geth.exe at %APPDATA%/Mist/binaries/Geth/unpacked if Mist was downloaded, or %APPDATA%/Ethereum Wallet/binaries/Geth/unpacked if Ethereum Wallet was downloaded (press Windows key + R, paste in the path and press enter to open it). If you are using Linux or Mac the following link may help in locating geth: https://ethereum.stackexchange.com/questions/9870/where-is-the-geth-exe-in-the-ethereum-mist.
Command Line Synchronization
To start a new network synchronization via the command line interface on Windows, do the following:
First, to remove all old wallet blockchain databases in case they have been corrupted (only required if you are having problems synchronizing, otherwise skip to the next paragraph):
1. Press Windows key + “R”
2. Type in “cmd”. Press enter.
3.1. If you use Mist, paste the following line into cmd, then press enter: cd %APPDATA%/Mist/binaries/Geth/unpacked
3.2. If you use Ethereum Wallet, paste the following line into cmd, then press enter: cd %APPDATA%/Ethereum Wallet/binaries/Geth/unpacked
4. Type “geth.exe removedb”. Press enter.
5. Type “Y”. Press enter. (do this twice)
Next, to start a new synchronization process:
1. While in a cmd window directed at the …/binaries/Geth/unpacked folder (as above), paste the following line into cmd, then press enter: geth.exe --fast --cache=1024 (Note that the --fast command may no longer be required in geth 1.7.0+, since geth seems to use fast mode by default)
2. Leave the cmd window open for a long time. When the synchronization is finished you should see messages of the type
INFO [04-05|19:23:06] Imported new chain segment blocks=1 txs=51 mgas=2.904 elapsed=1.515s mgasps=1.916 number=3480558 hash=ec84c9…fb5703
where “number” should be the same as “Last Block” on https://etherscan.io/ .
3. Close cmd and open your Ethereum wallet.
The command line window should show you exactly what is happening during the synchronization process, allowing you to identify problems. If you are getting constant error messages during the synchronization process, try searching for the messages in order to find a workaround. Near the end of the synchronization process you will probably notice that geth seems to be stuck only importing state entries. This is to be expected. As of October 2017 the process seems to require at least 31 million state entries before it is done, so you will need some patience.
Clean Up Old Blockchain Data
As the year 2017 draws to a close a standard (non-fast) Ethereum node synchronization which stores the entire Ethereum blockchain on your computer will require upwards of 400 GB of storage space. You can see the current blockchain size here: http://bc.daniel.net.nz/ . If you started a full or fast synchronization and decided to switch to the light wallet mode later, the blockchain data you have already downloaded will still sit around and take up space on your hard drive. In order to free that space up you may want to run the removedb command as shown below:
1. Press Windows key + “R”
2. Type in “cmd”. Press enter.
3.1. If you use Mist, paste the following line into cmd, then press enter: cd %APPDATA%/Mist/binaries/Geth/unpacked
3.2. If you use Ethereum Wallet, paste the following line into cmd, then press enter: cd %APPDATA%/Ethereum Wallet/binaries/Geth/unpacked
4. Type “geth.exe removedb”. Press enter.
5. Type “Y”. Press enter.
6. Type “N”. Press enter.
Add Tokens to the Ethereum Wallet
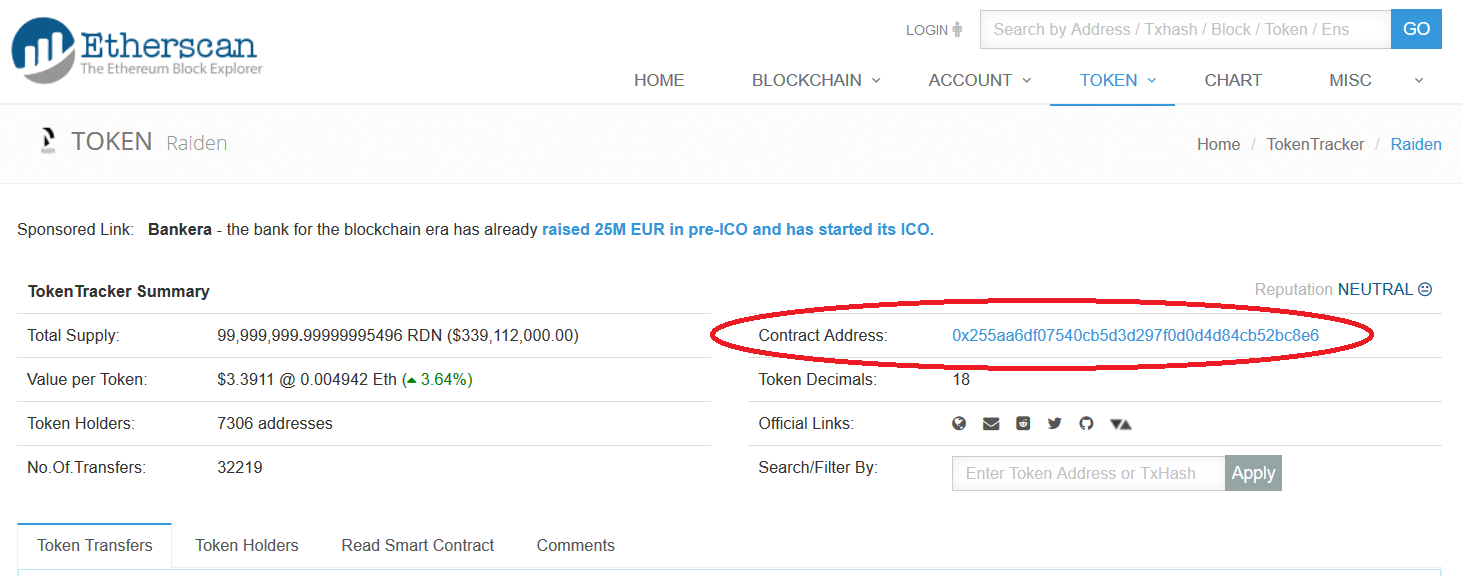
If you send tokens to your Wallet account, and you want to see them in the wallet or send them from the account, you must first add the token contract address to the Wallet. Find the token contract address by searching for the token name in https://etherscan.io/ (example address shown below for the Raiden token, inside the red circle).
Then in the top right of the Wallet click Contracts->Watch Token and paste the address. You should see something similar to the following picture:

If you use the Mist client, you can now handle the newly added token in the wallet in the same manner as Ether. If you download Ethereum Wallet (at least version 0.9.3) and want to send your tokens you have to go through an additional step: First, go to the Wallets tab (top left). Now, click on the account that owns the tokens and hoover the mouse over the token name in order to show the send button for the token (see image below). Pressing the send tab will not make the tokens show up for some reason (as of Ethereum Wallet version 0.9.3, this will probably be fixed in the future).

Interacting with tokens will be possible regardless of how you sync with the network, even with a light wallet client.
Retrieve the Ethereum Wallet Private Key
Behind the scenes, the Ethereum wallet uses one public key (the base for your Ethereum address) and one private key (akin to a password for your wallet) for all transactions. To increase security your private key is stored in a password protected file and never revealed to you. There are however situations where you may need to know your private key, e.g. if you plan on using the account in certain exchanges. Although the safest approach in such a case is to create a new account and transfer funds to it (then there is no risk that your private key may leak), you can also retrieve your private key via the following link: https://www.myetherwallet.com/ . Search for and click on “Keystore” or “Keystore File” in the website. You should end up on a page like in the image below. Then simply upload your keystore files and enter your password and you will get your private key. Keep the private key very safe as anyone with access to it has full control over your account.

Other Wallet Options
If you do not want to download the Ethereum wallet, or it just won’t work for you, there are a few other alternatives. The two most popular ones at the moment are the client-side web service https://www.myetherwallet.com/ (seen above) and the Parity wallet. These are less safe options compared to the official wallet, though. Indeed, Parity has been plagued by severe code flaws during 2017, leading to lost or locked up user funds, so I would stay clear of Parity for now.
